Sunday, July 28, 2013

How-To: Funky Oxford Shirt Nails

Hello again! As I mentioned in my last post, I'm super excited to start posting more nail tutorials regularly now that my nails are growing out. Unfortunately, I haven't had much time to sit down and create designs (hence the gaps between posts). In any event, I figured that the quality of posts was more important than the quantity, so the design I've created today is one that I'm proud of and hope you'll like!


To start off with, go ahead and grab your supplies...


 You will need (from left to right):
  • A light blue (Essie "Bikini So Teeny")
  • A dark blue or dark turquoise (Essie "Go Overboard")
  • A mint green (Sally Hansen "Mint Sorbet")
  • A dark green (Essie "Going Incognito")
  • A pink-y lilac (Essie "Under Where?")
  • A hot pink (L'Oreal "Members Only")
  • A multicolored glitter or holographic polish (Urban Outfitters "Afterhours")
  • A metallic silver (Sally Hansen "Pedal to the Metal")
Additionally, you will need small and medium sized dotting tools, a striper brush, and a base and topcoat.
 
 
Step 1.) Paint your nails two coats of the light blue, mint green, and lilac polishes in the order shown:


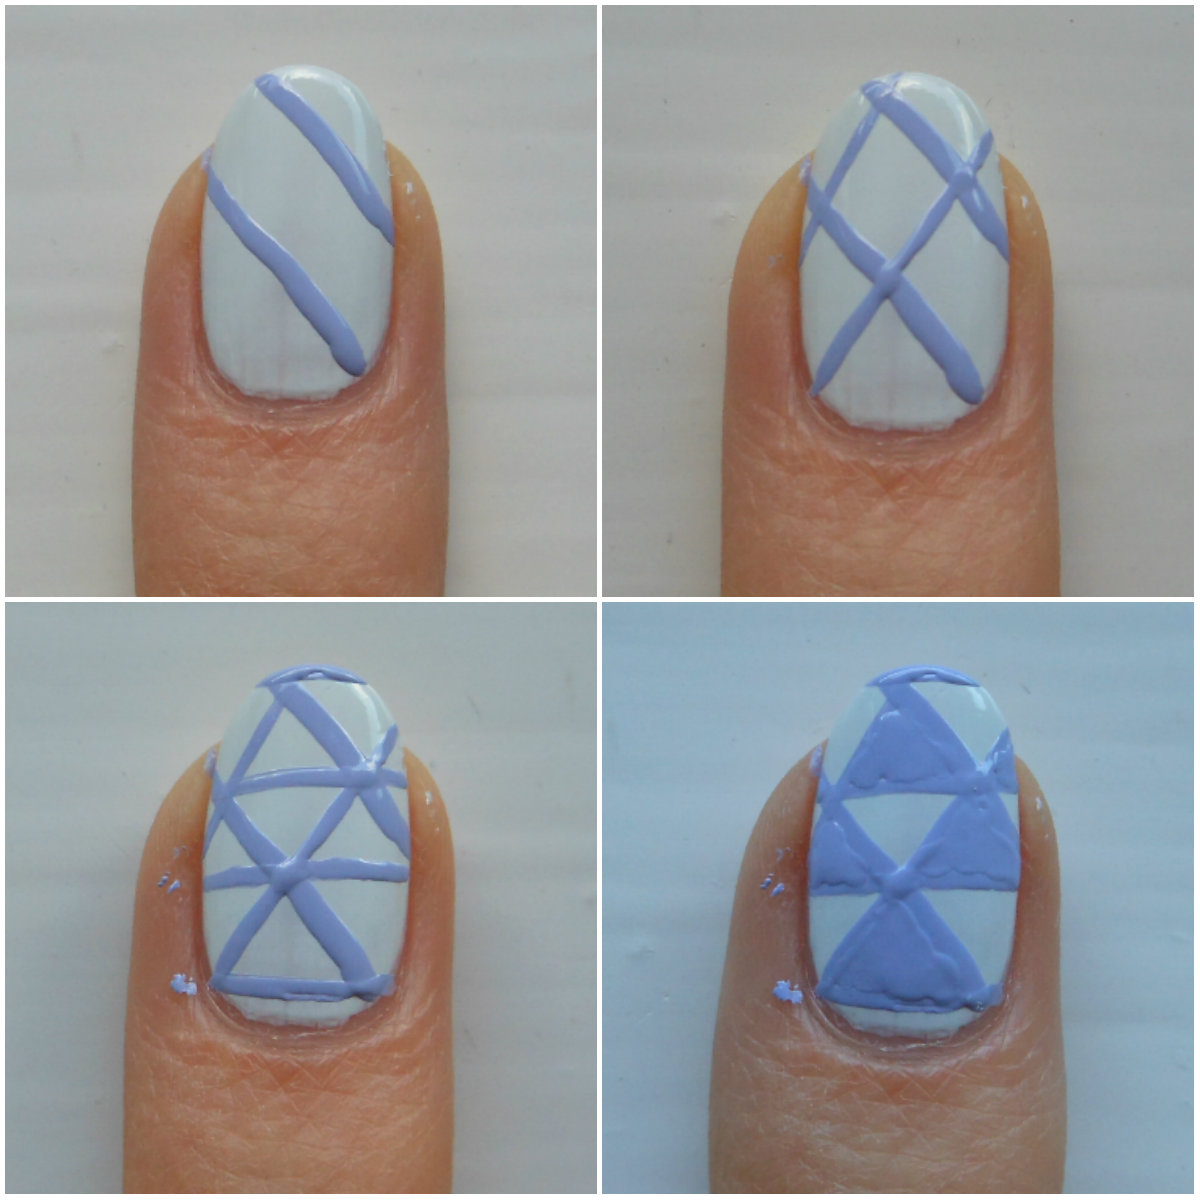
Step 2.) Follow the chart below to create collars on each nail:
 
Frame 1: Use a small dotting tool to plot out the points of the collar. On the blue nails use dark blue, on the lilac nail use hot pink, and on the mint green nails use dark green. (Be sure that the dots you place are evenly spaced).
 
Frame 2: Use your striper brush to connect the dots. Try to keep the line width consistent, but don't worry too much if one line is slightly thicker than the others.
 
Frame 3: Repeat frames 1 and 2 with the corresponding colors on the rest of your nails, and then use your striper to paint a thin vertical line from the middle of the collar to the tip of the nail (we'll place buttons here later).

 
Step 3.) Follow the chart below to create this design on your blue nails:

 
Top row: Use your striper and your dark blue polish to paint two reasonably thick lines on either side of the center line. Be sure to space your lines evenly and to keep the line width consistent. After the dark blue has dried, use your mint green polish to paint a thinner line inside the two thicker ones. To keep this design from being too predictable, I decided to use lilac instead of mint on my other blue nail.
 
Bottom row: Use a medium sized dotting tool and the dark blue polish to place a dot where the two sides of the collar meet. As the dot is drying, use whatever color you used to paint the thinner stripes to dot on some buttons along the center line. Finally, use the accent color of the other nail to add a dot inside the dark blue dot you made earlier.
 
Step 4.) Follow the chart below to create this design on your green nails:
 

Frame 1: Use your medium sized dotting tool to place a vertical row of dark green dots on either side of the nail. Then place a row of slightly smaller dots on top of the center line to represent buttons. As always, try to keep your spacing consistent.
 
Frame 2: Once your dark green dots have dried, use the mint green polish and your dotting tool to add slightly smaller dots on top. I used the same medium sized dotting tool to do this, and simply applied less pressure to create smaller dots.
 
Frame 3: Use a small dotting tool and your light blue polish to add smaller on top of the "buttons". Finally, use the same dotting tool and polish to carefully fill in the collar. Try using a stippling motion to dab on the polish- this helps it spread better. However, you could always fill the collar in with your striper instead.  
 
 
Step 5.) Follow the chart below to create the ring finger design:


 Top row: Use your medium sized dotting tool and hot pink polish to dab little flowers inside the space below the collar. I like to do this by creating a "v" shape and then adding another "v" beneath the first one so that the final shape ends up looking more like an "x". Use a stippling motion with your dotting tool for best results.
 
Bottom row: With the same hot pink polish, add a row of buttons on top of the center line. Next, I added a little pizzazz to the flowers by dotting multicolored glitter polish in the center of each one. Finally, use a metallic silver polish to add smaller dots on top of the hot pink ones, and to fill in the collar.
 
 
Step 6.) Once everything has dried, swipe on a layer of topcoat.
 
 
And that's it! I hope you enjoyed this tutorial- let me know if you give it a try!

Thursday, July 18, 2013

How-To: Trendy Triangle Nail Art


  Hi everyone! I'm back from Prague and am excited get back into my routine of weekly blog updates! Whilst I was away, I went entirely polish-free to give my nails a chance to grow and strengthen. Now they're finally starting to get to my preferred length again, and as a result I'm super motivated to crank out nail art tutorials! Today's look is a bright, modern, and sophisticated triangular design: 


So without further ado, if you've always wanted your nails to look like an Urban Outfitters bedspread, just keep on reading!

Step 1.) Gather your supplies:


The polishes I've chosen are O.P.I "My Boyfriend Scales Walls", Illamasqua "Milf", Urban Outfitters "Crowded", and Essie "Tart Deco".
My striper brush is by Orly, and I ordered it from Hautelook last month.
 
 
Step 2.) Paint your nails two coats of a white or off-white polish.


Step 3.) Follow the pictures below to replicate the pinky nail design:
 
 
Left: With your striper brush and green polish, create an "X" on the center of the nail, and fill it in with the same green polish and a large dotting tool.
 
Right: With your orange polish, use your striper to free-hand another smaller triangle underneath the two green ones. Mine looks pretty messy, but as you can see from the finished look, I ended up going back in and building up the triangle until the edges were clean.
 
Step 4.) Follow the chart below to paint your ring finger nail:


 Top Row: Use your striper and a periwinkle polish to place two parallel lines diagonally across the nail. Repeat on the other side of the nail. The two sets of parallel lines should intersect to form a crosshatched pattern.

Bottom Row: Next, place horizontal lines across the points at which the parallel lines intersect. This will divide the diamond shapes into triangles. Finally, use a medium sized dotting tool and the periwinkle polish to fill in every other triangle.

Step 5.) Follow the chart below to paint your middle finger:

Top Row: Plot out your first triangle by using a dotting tool to mark the center of the bottom 1/3 of the nail, as well as the two lower points of the triangle. Then simply connect the dots with your striper and orange polish.
 
Bottom Row: Use green polish and your striper to create a second, thicker peak. Carefully outline the edge of the orange polish before building up the line to the desired width. Be sure to leave a little gap for the final triangle, which you can fill in with periwinkle once the green has dried. 

Step 6.) Follow the chart to create the pointer finger design:


 Top Row: Use the technique shown in the previous chart to plot out the peak of an orange triangle. This triangle should start in the center of the nail, close to the cuticle, and should extend almost halfway up the nail. Next, use periwinkle polish to plot out where you want your two diagonal lines to intersect. Then with your striper, carefully paint in the lines, which should begin at the bottom points of the orange lines.
 
Bottom Row: Use your orange polish to divide the diamond shape in half, thus creating a triangle. Finally, fill in the lines with the appropriate colors of polish.
 
 
Step 7.) On your thumb nail, repeat the pattern that is on your ring finger with a different color of polish. I chose green, but you could always go for the orange.
 
Step 8.) As always, seal with a topcoat. I'm using the Sally Hansen Insta-Dri topcoat that I reviewed in my last post, but will be purchasing new Seche Vite soon!
 
I hope you found this tutorial helpful, and do tell me if you end up trying it out!
Bye!


Tuesday, July 2, 2013

Top Coat Wars: Seche Vite v.s Sally Hansen Insta-Dri

Hi guys! Before I leave for the Czech Republic tomorrow, I wanted to leave you with one last post (albeit a short one) that compares two well-known topcoats. I have bought both products twice and have used them on top of various nail polish formulas, so I feel pretty educated about both. Anyway, let the topcoat wars begin! 

Left: Seche Vite Dry Fast Top Coat, Right: Sally Hansen Insta-Dri Anti-Chip Top Coat


Sally Hansen Insta-Dri
Approx. $6 USD at drugstores


 People all over the interwebs have been heralding this topcoat as the Seche Vite of the drugstore, which was what drew me to purchase it instead of the other fifty million brands of topcoat at my local Walgreen's. I can kind of see why this was hyped up as a Seche alternative, but there are definitely some key differences that I'll touch on in a minute.
 
First, though, let's start with what I like about this product:
 
1.) The price is right
2.) It's readily available at my local Target, CVS, Walgreen's, and grocery stores
3.) The finish it gives is nice and shiny
4.) The smell is not very strong
5.) The brush is nice and wide, but not too wide.
 
As you can see, there are lots of positives that Sally Hansen Insta-Dri brings to mind, but the few negatives that I have experienced with this product are sufficiently annoying. Let's start off with the fact that this topcoat is very likely to create air bubbles on the nails, especially towards the end of the bottle's lifespan:
 

If you look closely at the picture above, you'll notice lots of tiny clusters of air bubbles, especially on my pointer and middle finger nails. (By the way, this design is not my own- I followed a YouTube tutorial by the talented elleandish http://www.youtube.com/watch?v=o5dza9V0HLc). Anyway, I did not do anything that would effect the smoothness of the topcoat (i.e, vigorously shaking the bottle right before application or applying too much product), so I've concluded that the bubbles are purely the fault of the formula. So that's annoying.
 
Additionally (and most importantly), this topcoat will smear nail art designs like no other if you aren't super careful. When I use the Sally Hansen Insta-Dri, I wait 2-3 times as long for my designs to dry than I do if I use Seche Vite. I don't have any pictures of the smears that occur with this topcoat because in my frustration I never thought to collect evidence, but I'm sure that you can imagine what streaky black striper lines would look like.
 
Lastly, I'll address dry time. Basically, the Insta-Dri is not dry to the touch in 30 seconds as the bottle claims, which doesn't surprise me and is just a gimmick anyway. In 30 seconds you can lightly tap the nail and not smear your manicure, but you will ruin the smooth surface with an indentation of your fingerprint. In 5 minutes the topcoat is usually an acceptably dry, but still feels much tackier than Seche Vite does after the same amount of time.
 
Seche Vite Dry Fast Top Coat
$10 at Ulta and varying prices at amazon.com


This, ladies and gentlemen, is the infamous Seche Vite. I realize that this isn't absolutely everyone's favorite topcoat, but it is definitely the most talked about and raved about topcoat on the internet. In my opinion, the hype is well-deserved, because this meets all of my most important topcoat needs:
 
1.) It's the glossiest topcoat I've found
2.) It dries the fastest (5-10 minutes and it's almost completely hardened, dry to the touch in under a minute)
3.) The price isn't hideous (although it certainly isn't the cheapest)
4.) It won't smear nail art
5.) It protects against chipping for the longest amount of time

The only negatives that I can think of are 1.) the smell, and 2.) the tendency of the formula to get extremely gloopy and difficult to use about halfway through the bottle.

In regards to the odor of this topcoat, it has a very strong chemical scent (paint thinner comes to mind) that tends to linger just a little bit. Although the smell is kind of overwhelming at first, I learned to accept it after I saw how amazing the topcoat wore on my nails. As far as the 1/2 bottle gloopyness, Seche Vite actually sells a companion product called Seche Restore, which does exactly what you think it would by de-glooping your bottle of topcoat. Just put in a few drops and your Seche Vite is good as new!

Lastly, I know that the thickness of this topcoat tends to throw people off at first (myself included). The best way to work with Seche Vite's consistency is to put one glob of topcoat close to the cuticle and then quickly spread upwards towards the tip of the nail. If you dip the brush back into the bottle halfway through topcoat application, you may get air bubbles and an uneven surface. Trust me though- after you get used to the formula, all other brands of topcoat are likely to pale in comparison!

In conclusion, the winner of topcoat wars is...

SECHE VITE (despite limited availability and a higher price point)
I still think that Sally Hansen Insta-Dri is an okay topcoat, and even a good one if you don't wear nail art on a regular basis.

Anyway, I hope this review has been helpful (sorry about the rambling, but there were lots of details to address!). Have a lovely day/evening, and I'll see everyone in two weeks!

Friday, June 21, 2013

How-To: Elegant Lace Nail Art

Hi guys! Lately I've been in a particularly girly mood when it comes to painting my nails, which is the inspiration behind this ultra-feminine lace design. Thankfully, this nail art wasn't too difficult to achieve, despite its detailed appearance. Keep reading to find out for yourself how to recreate it!


Step 1.) Paint your nails two coats of any polish that you think is sophisticated yet girly. The base color of this design isn't too important, so feel free to leave it up to your personal preference!

Step 2.) Use a white striper to paint a thin, curved line approximately 1/3 to 1/2 of the way down the nail. The easiest way to do this is to start on one side of the nail and rotate your finger while keeping the striper stationary. Stop rotating once the brush has reached the center of the nail, and then repeat this motion from the other side of the nail, joining your two lines in the middle.


Step 3.) Create a crosshatch pattern inside the curved line you just painted.
 
 Left: Paint 3-4 evenly spaced diagonal lines. It's easiest to paint the middle line first and then space the others in proportion to that middle line.
Right: Once the lines have dried, paint more diagonal lines that slant in the opposite direction. The newer your striper polish is, the smoother the lines will be. Unfortunately, my bottle is getting a bit old and gloopy! 


Step 4.) Use a large dotting tool and white polish to create a scalloped edge underneath the crosshatched section. (You'll notice that my polish has a gray tinge to it- my regular white is dried out, so I had to use a light gray >_<)


Left: Start out by placing one dot in the center of the nail. This will make it easier to arrange the other dots evenly across the curved line.

Right: Place more dots along the curved line, being careful that the edges of the dots overlap slightly onto one another, but not onto the crosshatched pattern.


Step 5.) Add some dotted details


 Left: Use a slightly smaller dotting tool to place dots of your base color inside the scallops. Try to center these dots neatly, but it's okay if they aren't totally perfect (obviously mine aren't!)
 
Right: Use a small dotting tool and white polish to place more dots underneath the scalloped edge. I think this looks best when the dots are positioned in between the dips of the scallops. 
 
 
Step 6.) Finally, wait at least 25-30 minutes before applying a topcoat. Designs like these are prone to smearing, which is why we need to allow extra drying time.
 
Products Used:


 Essie "Under Where?", Kiss Nail Art Paint in white, O.P.I "My Boyfriend Scales Walls"
 
Base and Topcoat: Orly Bonder and Sally Hansen Insta-Dri
 
 
Well, that's it! Thanks so much for reading, and I hope you've found this interesting! Feel free to share any tutorial suggestions and recreations in the comments below :)

Sunday, June 16, 2013

May/June 2013 Favorites + Reviews

 
Hello there! Today I have some favorites from the past 6-7 weeks to share with you, one of which is a candle- yes, I believe this means that I am now a full-on beauty blogger. Anyway, without further ado, here are my May/June favorites, complete with swatches, links, and reviews: 


1.) Tarte emphasEYES Inner Rim Brightener


I bought this pencil a couple of weeks ago as a replacement for my Pixi Eye Bright liner. Although I could have saved $2 and bought the Pixi liner, I was interested to check out the Tarte equivalent since everyone and her dog seems to be raving about it. Obviously, the raving is well deserved since this pencil has made it into my favorites, and will probably stay there for a long time!
So you can see this liner's brightening effect for yourself, below are some pictures that I took of my makeup-free eyeball with and without emphasEYES.
 

Top image: my eye without liner, bottom image: my eye after lining the waterline with Tarte emphasEYES.
 
As far as texture and lasting power are concerned, this liner is smooth, easy to apply, and lasts on me for 5 hours without fading (however, it doesn't all come off until I take it off). In my experience, the Pixi liner tends to fade faster and awkwardly migrate closer to the lash line. Bottom line: I'm still a fan of the Pixi liner, but Tarte has won me over with excellent staying power.
 
 2.) NYX blush in Peach

 
Normally I'm a cream blush type of person, but this month I've really been enjoying NYX's blush in Peach. Contrary to the name, this blush is actually a lovely fresh pink color. On my fair skin, it instantly makes my face look a bit livelier and more awake. The texture of this blush is very finely milled and velvety, which makes it super-blendable- definitely high end quality for a five dollar product! Lastly, if you do decide to follow the link to cherryculture.com, don't trust their images of products- do a Google search for more accurate swatches.
 
 
3.) Illamasqua Cream Pigment in Hollow


After hearing a ton of hype about this being the perfect contour shade for fair skin, I finally caved and shelled out for Illasmasqua's Hollow. I've been a big fan of Illamasqua nail polishes for awhile, and I expected the same quality from their makeup. Needless to say, I was not disappointed- the cool but not muddy color of this pigment really is ideal for contouring on paler skin tones. Additionally, Hollow is nearly undetectable because its cream texture sits very naturally on the skin- definitely worth the $26! However, I wouldn't use this as a cream eyeshadow if I were you, as it creases pretty badly.


4.) Essie nail polish in Pilates Hottie
Approximately $8 USD at drugstores, Target, Ulta, etc.


Essie's Pilates Hottie has been in my collection for awhile, but I've recently been wearing it a lot throughout the Spring and into the Summer. I would describe this polish as a light, subdued pink-y lilac shade with a crème finish. Additionally, Pilates Hottie is opaque in 2 coats and versatile enough to wear to the office (well, most offices).
 
5.) Burt's Bees Lemon Butter Cuticle Cream
$6 USD at drugstores, grocery stores, etc.
 
 
If I had to choose a #1 favorite for May/June, this cuticle cream would have to be it. Honestly, I can't think of one drawback- it's inexpensive, lasts a long time, smells delicious, and really moisturizes the cuticles. I've been applying this twice a day to my nail beds, and within 2 weeks noticed that my cuticles were smoother and that my nails were beginning to get stronger. As far as the scent goes, it smells like pure, freshly squeezed lemon juice- no artificial tinge to the scent at all. Definitely give it a try!
 
6.) Niven Morgan Floral Amber Velveting Body Lotion
 
 
I received this body lotion as a gift a few weeks ago and quickly fell in love. It. Smells. Wonderful. I would describe the scent as sophisticated, with floral notes balanced with sandalwood and musk (I hate that word... musk... it sounds rather unattractive, doesn't it?). Anyway, I love how warm and luxurious the scent is. As far as the lotion itself, I am a very happy camper- as the name suggests, the texture is very velvety and light, but still moisturizes nicely. Lastly, my favorite part about this lotion is that the scent lingers for quite awhile- even after the lotion has absorbed into the skin, the scent remains, so lately I've been using this as a moisturizing perfume.
 
7.) Paddywax Lavender + Thyme Artisan Soy Wax Candle


I picked this candle up on a whim at Urban Outfitters last month, even though I have never been much of a candle fan (I'm extremely picky about scents). However, once I got it home and lit the wick, I was pleasantly surprised by the subtleness of its aroma. The lavender and thyme scent is very relaxing, and is perfect to have burning on lazy afternoons. Unfortunately, I didn't notice that the aroma traveled very well, and would recommend this candle only for use inside smaller rooms. According to online reviews, many people complained that the scent wasn't strong enough, which is interesting because I actually really enjoy its subtlety. Bottom line: if you enjoy strong scents, skip it; if you have a sensitive nose and prefer lighter scents, give this candle a try!
 
 
Welp, that concludes my May/June 2013 favorites! I hope you've found these recommendations helpful, and have a lovely day!


Saturday, June 8, 2013

How to Adapt Nail Art for Short Nails

Hello lovely readers! Instead of a typical tutorial, I thought that today I could share some techniques on how to adapt nail art designs for shorter nails. Frequently, nail art is displayed on either medium length or long nails, which leads those with shorter nails to question how to recreate the design. Personally, I think that with a little creativity 99.9% of designs can be adapted, which I've been figuring out in the process of re-growing my nails. So without further ado, here are some basic tips that can be applied to most designs:

1.) Use smaller tools
 
Left: On longer nails. Right: Adapted to short nails by using a smaller dotting tool, including only two flowers, and shortening the stems.
 
If fitting a design onto shorter nails means having to cram it on or cut some of it off, try using smaller tools to shrink the design so that it doesn’t look crammed onto smaller nails.
Left: On longer nails. Right: Adapted to short nails by using a smaller dotting tool to stipple on the white heart and feet. 
For example, if a design calls for a medium dotting tool, see if using a small dotting tool would be more proportionate to your nail size. I usually only shrink designs if they aren’t patterns, which leads me to tip number two…
 2.)  When recreating patterns, simply include less of the pattern
 
 
 Left: On longer nails. Right: Adapted to short by including 2 rows of dots instead of 3.
What I mean by this is that if someone with long nails can fit 4 rows of a pattern, folks with shorter nails may only be able to fit 2-3. Usually, sacrificing a row or two of pattern doesn’t affect the integrity of the design- fewer rows also means that you probably won’t have to use smaller brushes/dotting tools.
 
3.) Be extra neat when painting near the cuticles 

Left: Unflattering gap. Right: Polish is applied closer to the cuticle and the nail looks instantly longer (excuse the air bubbles).
 
It’s common knowledge that you aren’t supposed to paint your cuticles, but leaving a significant gap between your cuticles and the beginning of your polish can make short nails appear even shorter. Try to get as close as possible to the cuticle when painting your nails- if you accidentally get polish on the cuticle, just use a Q-tip and polish remover to wipe it away. For an even more precise line, dip a small paintbrush/ nail art brush into polish remover and gently shape the edge of the polish.


4.) For ombre or gradient looks, paint thinner stripes of  color onto your sponge
 

Left: Longer nails are able to fit thicker blocks of color. Right: More colors can be fit onto short nails if the stripes of color are thinner.
 
Although fitting 2-3 colored ombre designs onto shorter nails isn’t too difficult to figure out, squeezing an entire rainbow onto tiny nails can be tricky. If your nails are very short, or if the width of your nails is larger than their length, try sponging your gradient going vertically instead of horizontally across the nail. You may be able to fit on more colors this way. Since my nails are longer than they are wide, I just stuck with decreasing the thickness of each block of color.
 
Lastly, all of the designs (except for the penguins) I've shown are from my previous tutorials which I'll link here:
 

Thanks for reading and have a wonderful day!


Sunday, May 26, 2013

How-To: Easy Citrus Nail Art

 
Hello lovelies! Today I was inspired to create an easy summer nail art look after researching key lime pie recipes (yum). The result was a fun, citrus design that I think is perfect for the upcoming season. If you want to know how I achieved this look, just keep on scrolling... 
 
 
Step 1.) Paint your ring fingers a light blue color, and then follow the chart below to create half moons on the rest of your nails.


Left: Position a circular sticker 1/3 to 1/4 of the way up the nail (you can use paper reinforcement rings for this as well, but any small round sticker will do). Then press down the edges to make sure that there are no gaps for the polish to seep through.

Right: Paint one thick coat of the same blue polish above the sticker. Finally, immediately remove the sticker by pulling it towards and away from the polish instead of down. This ensures that your edge will be neat.


Step 2.) Grab two different sizes of dotting tools, yellow polish and green polish, and then follow the chart below:


 Left: With a medium sized dotting tool, make three dots on the edge of the half moon. To add some variety, I decided to alternate green and yellow dots.
 
Right: Use a tiny dotting tool (or a toothpick) to make smaller dots inside the larger ones. Make yellow dots inside the green ones, and vice versa.
 
 
 Step 3.) Adapt your stickers to make a stencil for the ring fingers (pssst! I recommend doing this before you paint your nails):

 
Top: Place one sticker halfway on top of another.
 
Middle: Trace along the edge of the sticker.
 
Bottom: Carefully cut out the traced edge. 
 
 
Step 4.) Place the stencil on top of your ring finger nail so that the bottom third of the nail is exposed. Next, paint on a thick coat of either green or yellow inside the space you created before peeling off the stencil (I used green on one ring finger and yellow on the other). Depending on the opacity of your polish, you may need to carefully paint on a second coat.
 
 
Step 5.) Get out your trusty white striper and follow the chart below to paint on some citrus-y details:


Top Row: After your second coat of polish has dried, outline your lemon/lime slice with a white striper. This will give you an opportunity to cover up any mistakes that may have occurred during the application of the second coat.

Bottom Row: Create three slightly curved lines that run parallel to the outline of the lemon/lime. Lastly, complete the wedge sections by painting two lines extending down from the edges of each curved line. Make sure that they all meet at one point near the cuticle.


Step 6.) As always, seal in your nail art with a topcoat for the finishing touch!

Products Used:


 Delia*s "Blue Dream", Illamasqua "Milf", Sally Hansen "Mellow Yellow", Kiss Nail Art Paint in white.


Thanks so much for reading! I hope you give this easy design a try (feel free to post any comments or recreations below!)