
Hi everyone! I'm back from Prague and am excited get back into my routine of weekly blog updates! Whilst I was away, I went entirely polish-free to give my nails a chance to grow and strengthen. Now they're finally starting to get to my preferred length again, and as a result I'm super motivated to crank out nail art tutorials! Today's look is a bright, modern, and sophisticated triangular design:

So without further ado, if you've always wanted your nails to look like an Urban Outfitters bedspread, just keep on reading!
Step 1.) Gather your supplies:

The polishes I've chosen are O.P.I "My Boyfriend Scales Walls", Illamasqua "Milf", Urban Outfitters "Crowded", and Essie "Tart Deco".
My striper brush is by Orly, and I ordered it from Hautelook last month.
Step 2.) Paint your nails two coats of a white or off-white polish.

Step 3.) Follow the pictures below to replicate the pinky nail design:

Left: With your striper brush and green polish, create an "X" on the center of the nail, and fill it in with the same green polish and a large dotting tool.
Right: With your orange polish, use your striper to free-hand another smaller triangle underneath the two green ones. Mine looks pretty messy, but as you can see from the finished look, I ended up going back in and building up the triangle until the edges were clean.
Step 4.) Follow the chart below to paint your ring finger nail:
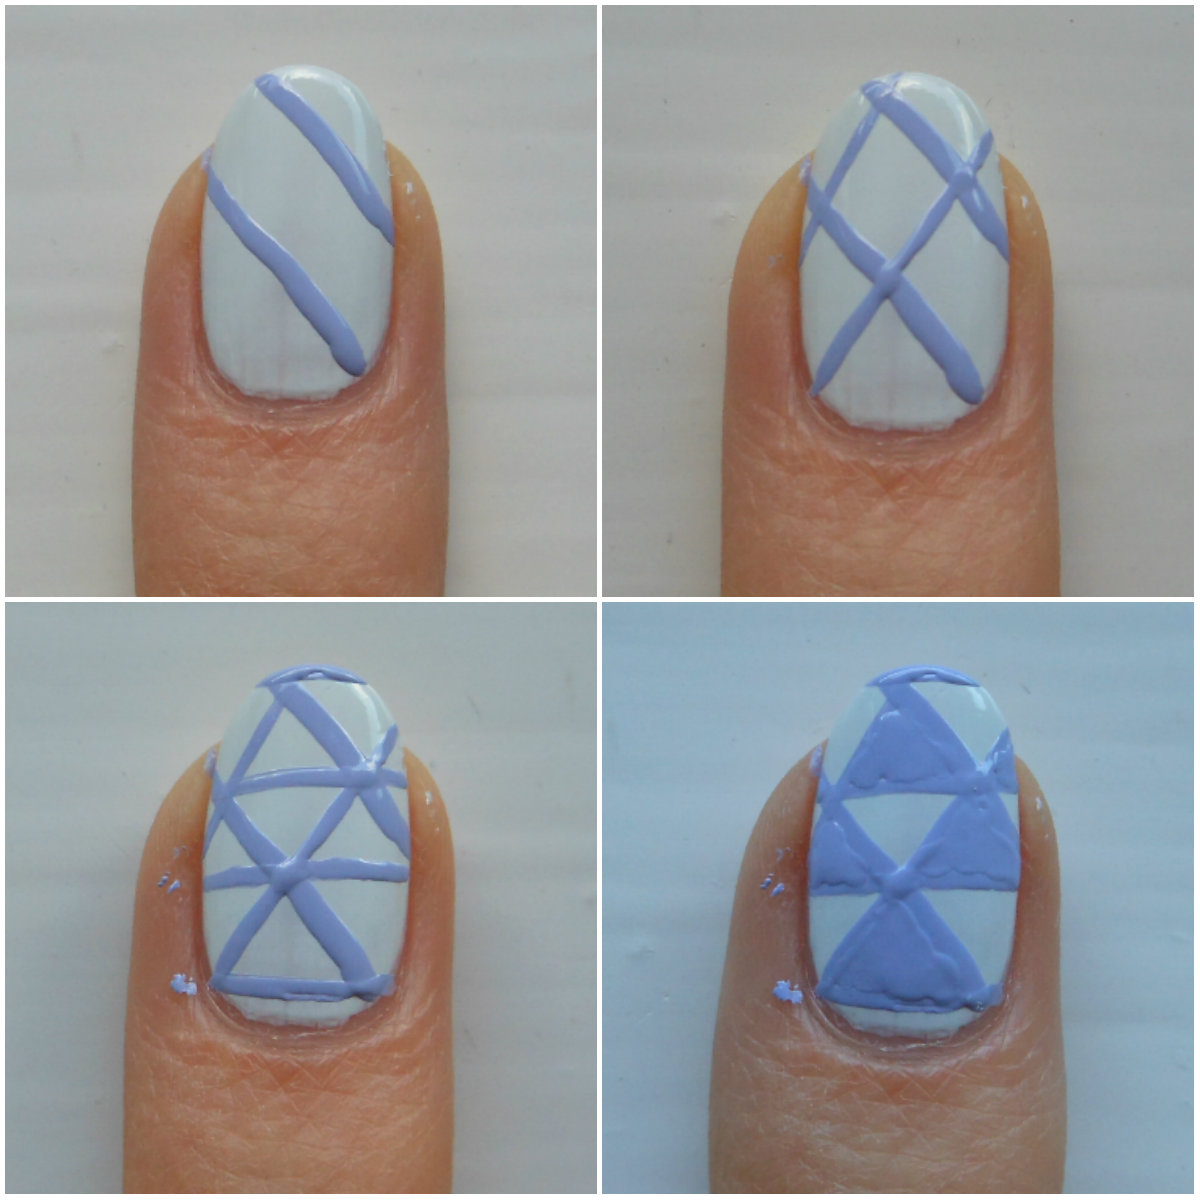
Top Row: Use your striper and a periwinkle polish to place two parallel lines diagonally across the nail. Repeat on the other side of the nail. The two sets of parallel lines should intersect to form a crosshatched pattern.
Bottom Row: Next, place horizontal lines across the points at which the parallel lines intersect. This will divide the diamond shapes into triangles. Finally, use a medium sized dotting tool and the periwinkle polish to fill in every other triangle.
Step 5.) Follow the chart below to paint your middle finger:

Top Row: Plot out your first triangle by using a dotting tool to mark the center of the bottom 1/3 of the nail, as well as the two lower points of the triangle. Then simply connect the dots with your striper and orange polish.
Bottom Row: Use green polish and your striper to create a second, thicker peak. Carefully outline the edge of the orange polish before building up the line to the desired width. Be sure to leave a little gap for the final triangle, which you can fill in with periwinkle once the green has dried.
Step 6.) Follow the chart to create the pointer finger design:

Top Row: Use the technique shown in the previous chart to plot out the peak of an orange triangle. This triangle should start in the center of the nail, close to the cuticle, and should extend almost halfway up the nail. Next, use periwinkle polish to plot out where you want your two diagonal lines to intersect. Then with your striper, carefully paint in the lines, which should begin at the bottom points of the orange lines.
Bottom Row: Use your orange polish to divide the diamond shape in half, thus creating a triangle. Finally, fill in the lines with the appropriate colors of polish.
Step 7.) On your thumb nail, repeat the pattern that is on your ring finger with a different color of polish. I chose green, but you could always go for the orange.
Step 8.) As always, seal with a topcoat. I'm using the Sally Hansen Insta-Dri topcoat that I reviewed in my last post, but will be purchasing new Seche Vite soon!
I hope you found this tutorial helpful, and do tell me if you end up trying it out!
Bye!
No comments:
Post a Comment